Arch Linux’s official website describes Arch as a distribution that “tries to Keep It Simple”. It also states that Arch is not for those without the ability or time for a “do-it-yourself” system–which is true. I recently built a machine that needed a lightweight OS, so Arch Linux was a good choice. Installing Arch Linux can seem complicated, but understanding what needs to happen in each step of the install makes it feel fun and easy. Here’s what I did:
The Arch Linux installation guide lists each step to install Arch and provides links to a variety of wiki pages that are worth reviewing before you begin. I opted to practice installing Arch Linux on a virtual machine in my home lab, so I downloaded an Arch iso and spun up a VM.
BIOS and UEFI are both interfaces that boot the operating system, but UEFI is newer and more powerful. My VM allowed BIOS, so that is what I used, but it is important to remember which you chose for steps later in the install.
Whether you are installing Arch Linux on a VM or real computer, the first step is to confirm you can connect to the internet on the machine you are running the install. With Arch you are building the OS from basically nothing, and without an internet connection you wont be able to install the packages required for a functioning computer. Connect to an ethernet cable/wireless LAN and check your network with a few commands:
ip link
ip addr
ping google.com
If your link is up, you have an IP address, and you can ping a website you are ready to continue with the install.
Updating the system clock is a surprisingly important step in installing Arch Linux. I passed over this step at first and it prevented me from reaching any mirror servers (mentioned later) to install essential packages. To avoid that you can use timedatectl commands to update the clock:
timedatectl status shows you the timezone/time set on your machine
timedatectl list-timezones to view all timezones, and find the one for your area.
timedatectl set-timezone _timezone _to set the right timezone
A partition is a logical division of storage that allows you to allot a set amount of space on a computer’s disk for different purposes. Each partition stores 1 file system which organizes the partition’s information. Partitions can be mounted on a mount point, which gives the partition access to the file system through a directory. It is possible to make dynamic partitions that grow/shrink depending on disk usage with LVM (logical volume manger), but I opted to use regular partitions for this basic install.
There are two types of partitions: primary and extended. A primary partition is your typical partition that stores a complete file system. However, only 4 primary partitions are allowed on a single disk, so if you would like more 5+ partitions you have to use an extended partition. You are only allowed 1 extended partition per disk, and it is counted as 1 of your 4 primary partitions, but extended partitions can contain an unlimited number of smaller logical partitions.
Some partitions commonly used are:
- The root partition: contains many top-level directories like /etc and/bin that store important information & configuration files for a system. Where the primary filesystem is mounted and where all other file systems stem.
- The swap partition: provides memory that can be used as “overflow” virtual RAM
- The boot partition: stores the kernel, images, and the bootloader, not required for a system to function but used during the boot process upgrades.
At this point it is important to remember if you chose UEFI or BIOS to boot your machine. If your machine is booting in UEFI mode, you will use a globally unique identifiers (GUID) partition table to create your partitions. GUID is alternative partitioning style that aims to fix quirks found in older partitioning methods. For GUID you’ll create a root partition, swap partition, and a EFI system (boot) partition. BIOS however, uses a master boot record (MBR) to store the OS bootloader and the partition table. So if you are using BIOS, as I did, you’ll only need a root partition and a swap partition.
I used fdisk to manipulate the disk’s partition table.
I viewed the partition table with fdisk -l then began editing the main disk by entering fdisk /dev/sda since my VM’s disk was /dev/sda.
fdisk’s command mode allows you to enter single letters to specify actions. Entering “m” will show you all possible commands and make navigating fdisk easy.
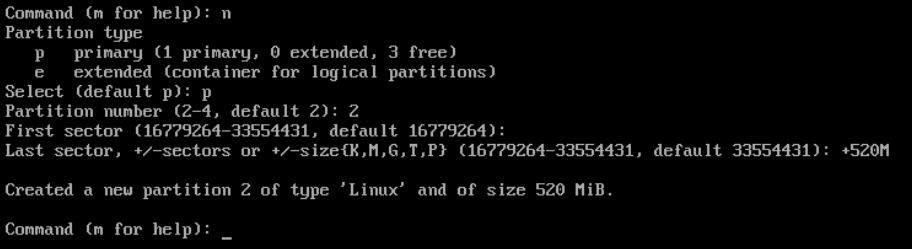
Type “n” to create a new partition.
Type “p” to create a primary partition, or “l” to create a logical partition (in an extended partition) .
You’ll be ask to enter the number of the partition, which will give the partition the name /dev/sda#. I entered 1 for my first partition, 2 for my second, etc.
Next specify the sector of the disk where you want the partition to start. Press Enter to accept the first free sector.
Lastly, specify the last sector of the disk you want the partition to occupy. This is how you control the size of your partition. You can use the format +_size_K/M/G to set the size of the partition in kilobytes (K), megabytes (M), or gigabytes (G). If you want to use all remaining space, press Enter.
- Swap partitions should be 512+ MiB
- Boot partitions (if using) should be 260-512 MiB
- Root partitions should take up the remainder of the device.
Typing “w” will write the changes and put you out of fdisk’s command mode.
Enter fdisk -l to view your partition table again. You should see the new partitions you created and be able to check that their names/sizes are correct.
Finally, your root partition needs to be bootable.
Entering fdisk -u /dev/_partition_ puts you into the command mode of a particular partition. Enter the command mode of your root partition and enter “a” to toggle a bootable flag.
Then confirm the number of the partition you want to make bootable (In my case, 1) and enter “w” to write the changes. If you view your partition table again, your root partition will have a “*” next to it, signifying it is bootable.
Once the partitions are created, they must be given a file system. I gave my root partition an ext4 file system and intialized my swap partition using:
mkfs.ext4 /dev/<em>root_partition</em>
mkswap /dev/<em>swap_partition</em>
swapon /dev/<em>swap_partition</em>
The root partition’s file system needs to be mounted through the file system’s /mnt directory.
mount /dev/<em>root_partition</em> /mnt
After the partitions are made, you need to install a basic package, the Linux kernel (or kernel of choice), and firmware. This is done using pacstrap, which contacts servers across the globe called mirror servers to get essential packages for the system to run and download them.Like apt or get, pacman is the package installer for Arch Linux.
All mirrors are stored in /etc/pacman.d/mirrorlist, the higher the mirror on the list the more priority it has when downloading a package. You can edit the /etc/pacman.d/mirrorlist file using nano or vi to delete all mirror servers not in your area to speed up the process. Here, I used nano.
nano /etc/pacman.d/mirrorlist
ctrl+K to delete all mirror servers not in my region.
Then install the packages. The “linux-firmware option can be left off if your installing arch on a VM or a container.
pacstrap /mnt base linux linux-firmware
After the essential packages/kernel is installed, you can install any other packages you’d like. I downloaded a nano package, because you need a text editor to complete the last few steps of installing Arch Linux.
pacman -S nano
An fstab file allows you to set which partitions will be automatically mounted when the system boots. To generate the fstab file run:
genfstab -U /mnt >> /mnt/etc/fstab
Since the kernel and packages have been installed, you can now change root into the new Arch Linux system.
arch-chroot /mnt
Set the timezone, I used the same region as when I updated the system clock in step 2.
ln -sf /usr/share/zoneinfo/<em>Region</em>/<em>City</em> /etc/localtime
Generate a /etc/adjtime file with hwclock:
hwclock --systohc
Lastly, there are a few config files that need to be set.
Generate locales, which are used for correctly displaying information that depends on where you are in the world (monetary symbols, date/time, alphabets, etc).
locale-gen
Then edit /etc/locale.conf with the text editor package installed in step 4, set the LANG variable to the correct language.

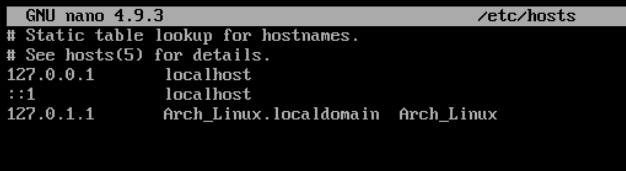
The hostname file sets the unique name given to your machine. Create the /etc/hostname file with your text editor, and enter the name you want to give your Arch Linux machine (I named mine Arch_Linux).
nano /etc/hostname
  <em>hostname </em>
You then add your hostname to the /hosts file, which is a static table lookup for hostnames. Here you’ll add your host’s loopback address.
Then, set the root password.
passwd
Finally, install a bootloader so you can remove the installation medium (USB, CD, .iso image, etc.) and the OS will be able to boot on the machine. This VM is a non-UEFI system, and while I chose to use grub there are many bootloaders to choose from. The commands to install grub on a non-UEFI system are:
pacman -S grub
grub-install /dev/sda
grub-mkconfig -o /boot/grub/grub.cfg
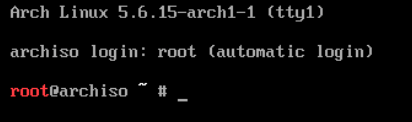
When you reboot your machine, you are then able to sign in as root and begin working on Arch Linux!