As I continue to study artificial intelligence I’ve been able to practice using Microsoft’s cognitive services. I was first introduced to cognitive services during the virtual Microsoft Build 2020 conference, and I’ve enjoyed getting to use them for myself. Since creating and training your own artificial intelligence/machine learning software is all kinds of complicated, cognitive services allow anyone to use AI in their projects without having to write much code. All you have to do is call the service that you want, and it will do the hard work for you.
The first step in using cognitive services is to deploy the appropriate resource in Azure. In the case of text analytics you’ll deploy the text analytics resource, but if you are wanting to use speech cognitive services you’d deploy a speech resource, etc. When deploying resources in Azure the basic steps are:
- Sign into you Azure account
- Select “create a new resource”
- Search for the resource you want and click “create”
- Give the resource a unique name, assign it to a subscription, a pricing tier, and a resource group. Here you can create a new resource group to place the resource in if you would like.

Cognitive services require that you have a key (found under the “keys and endpoints” menu of a resource) and that you know which location your resource is deployed in. This allows you to use your resource to talk to Microsoft’s cognitive service through API (application programming interface) calls or SKDs (software development kits).
The text analytics service allows you to detect the language of written text, key phrases, sentiment, and key elements that state intent called “entities”.
I used text analytics to detect sentiment in text, although the process is similar for any action using text analytics. The text analytics landing page “https://[location].dev.cognitive.microsoft.com/docs/services/TextAnalytics.V2.0” (where [location] is the region you deployed your text analytics resource) allows you to easily use POST methods to call the Text Analytics API. I selected the “sentiment” tab where you choose your region and enter the key of your text analytics resource. This information is included in the header section of the request so that it can be made from the right place.
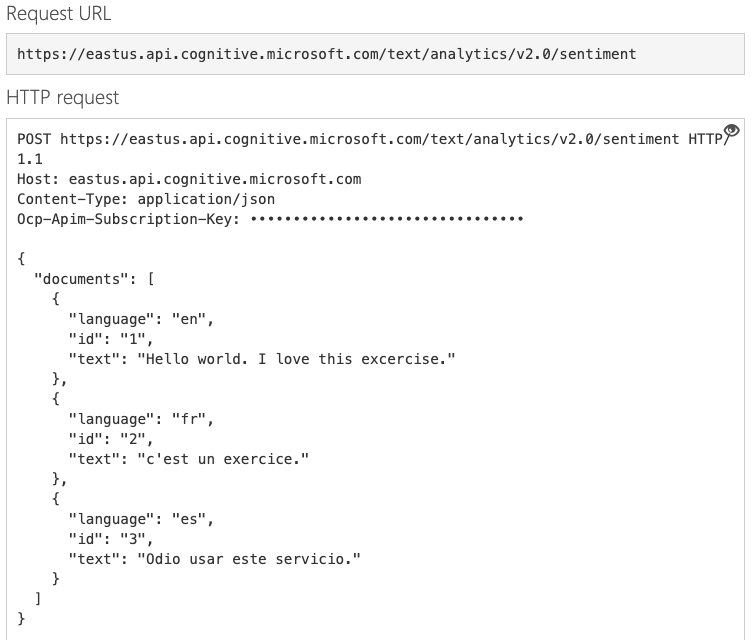
The request body itself consists of a document array. Each document has a language, id and text property that defines the text the text analytics service will be analyzing. You can pass documents up to 5,000 characters, and a single request can have 1,000 documents.
Once you enter the documents you want and give them the appropriate language property, a unique id and some text you can see the complete http request that will be sent to the Text Analytics API.
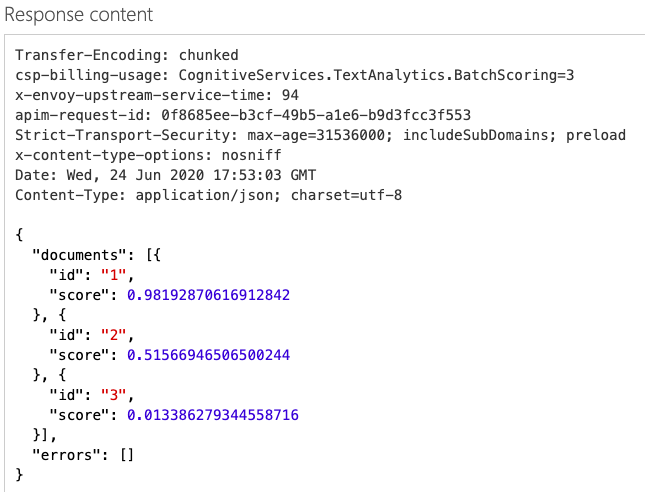
Once you send the request you’re given a response that lists the id of each document followed by their score. When detecting sentiment the Text Analytics API scores the text from 0-1. 0 being very negative sentiment and 1 being very positive. Below you can see how my three documents were ranked, the first being very positive, the second being neutral, and the third being very negative.
This particular service would be useful analyzing customer feedback or comments on a project. It’s a very powerful way to examine text without having to create your own AI or write any code (beyond creating your documents). All of the methods offered by the Text Analytics API could be helpful time-savers in a business and serve as a great intro to working with Microsoft’s cognitive services.